So I know I have been adding very unhealthy recipes as of late for the upcoming Super Bowl. So, here is something on the healthy side! Who says a Super Bowl party can't be healthy in the first place?? This is a delicious and easy baked chicken enchilada recipe that is only 450 calories for two of them! It is topped with a light and refreshing onion and herb salad, enjoy!
Ingredients
2 tablespoons extra-virgin olive oil, plus more for brushing
1 to 2 jalapeno peppers, seeded and sliced
3 cloves garlic, smashed
1/2 teaspoon dried thyme or 1 1/2 teaspoons fresh thyme
Preheat the oven to 450 degrees F. Heat 1 tablespoon olive oil in a large skillet over medium-high heat. Add the jalapeno, garlic, thyme and half of the onion. Cook, stirring, until soft, about 3 minutes. Add the chicken, 1 teaspoon salt and 3/4 cup water. Bring to a boil, then cover and cook until the chicken is tender, about 6 minutes.
Remove the chicken to a plate. Transfer the cooking liquid and vegetables to a blender; add the tomatoes and allspice and puree with the lid ajar. Wipe out the skillet, add the remaining 1 tablespoon olive oil and place over medium-high heat. Add the tomato mixture and cook until slightly reduced, 6 minutes. Pour into a baking dish.
Brush the tortillas with olive oil and put on a baking sheet; bake 5 minutes. Shred the chicken. Top each tortilla with chicken and cheese, then roll up and arrange in the baking dish, seam-side down, spooning some sauce on top. Bake until the cheese melts, 4 minutes.
Toss the herbs, remaining onion, and salt to taste. Sprinkle on top.
This is one of my favorite ways to do chicken breast. It is so simple that I can make it when I come home from work and it has so many great flavors! The first thing that you need to make sure when sautéing anything, particularly if you want to make a pan sauce, is to use either a cast iron or stainless steal pan. Put away the non-stick pans! The reason is you can't develop a good fond in a non-stick pan because, well...it's non-stick. Fond is a french cooking term for base and it commonly refers to the delicious browned bits and caramelized drippings from meat or veggies that form at the bottom of the pan when sautéing or roasting. We use the fond to create a much more complex depth of flavor. Enjoy!
Ingredients
4 chicken breasts
1/2 teaspoon salt
1/2 teaspoon pepper
1/2 teaspoon garlic powder
1/4 cup all-purpose flour
1 tablepoon extra virgin olive oil
1 tablespoon minced garlic
1 tablespoon minced shallot
1/2 cup cooking white wine
1/2 cup chicken stock
2 tablespoons unsalted butter, cubed and coated in flour
1/2 cup cream
2 tablespoons parmesan, shredded
2 teaspoons italian herbs, optional
Directions
Remove chicken breast from packaging and dry thoroughly with paper towels. Lay the chicken breasts between a layer of saran wrap and pound thinly. Season the chicken breasts on all sides with salt, pepper and garlic powder. Then dredge the chicken breasts in flour and pat off excess.
Heat your pan (remember no non-stick!) over medium high heat. When the pan is hot add in your the EVOO, it should shimmer when added. Carefully add the chicken breasts to the pan and sauté 3-4 minutes on each side until golden brown and the internal temperature reaches 160°F. Remove from pan to a cooling rack and let rest (Don't worry, the internal temp. will reach 165°F with the carry over cooking).
You may need to add another tablespoon of EVOO to the pan, if you have enough don't worry about it. Add in the garlic and shallot and sauté until fragrant, about 1 minute. (It's very important to have all your ingredients, mis en place, ready for the pan sauce because the garlic and shallot will burn very quickly if you don't move quickly). Add in the white wine and deglaze the pan with a wooden spoon (scrap all the brown bits off the bottom). Reduce the white one until almost fully evaporated, almost syrupy consistency. Add in the chicken stock and reduce that liquid by half. Remove your pan from the heat and add the butter in a few cubes at a time and whisk in until the sauce begins to thicken. Whisk in the cream and parmesan cheese until it has melted. Finally whisk in the herbs. You want to add your fresh herbs in at the end, off the heat because cooking them can destroy their flavor. Slice your chicken breast and drizzle the cream sauce on top.
Don't mind the grease splatter on the Thermapen :)
One of the most important tools every...EVERY kitchen should have is a quality thermometer. Thermapen is the best hands down.
"The Super-Fast Thermapen is a professional tool (originally designed for commercial kitchens, labs and manufacturing plants) that has become the top consumer cooking thermometer for home use. Its popularity among celebrity chefs, cooking magazines, top foodies, bloggers and competition BBQ teams has made the Thermapen into an essential tool in the best-equipped home kitchens and backyard BBQ rigs.
Made by Hand in England, the Thermapen is faster and more accurate than any other cooking thermometer on the market. Competitors have tried to copy the Thermapen with mass-produced products made in China and have flooded the housewares market with slower, less-accurate knock-offs. However, when compared to true competing commercial thermocouple thermometers, the Thermapen is not only faster and more accurate, it's also less expensive!
The Thermapen's speed and accuracy will reveal more about food and cooking techniques than you ever imagined. You'll learn that temperatures are always changing; a roast is never the same temperature throughout while cooking. If you want to know what's really going on, get a Thermapen.
If you want to experience speed and precision (traceable to National Standards) and you're on a quest for culinary perfection, you will want a Thermapen Add up the expense of wasted meats alone and you'll justify the cost of this professional tool.
A Thermapen an be used for virtually anything that needs to be cooked or chilled. Use it on meats, fish, casseroles, re-heated foods, breads, cakes, deep frying and candy. You don't have to have a Thermapen o be a great cook; however, more than one celebrity chef and several food writers havetestifiedthat a Thermapen ill make you a better cook...AND, you can choose your own color! Order one today."
They come in various colors and are the perfect thermometer for either the home cook or cooking professionals. I've owned several thermometers in the past and all of them have either broke, melted or a pain because you have to keep on calibrating them. Save yourself the frustration and money and just buy yourself a Thermapen!
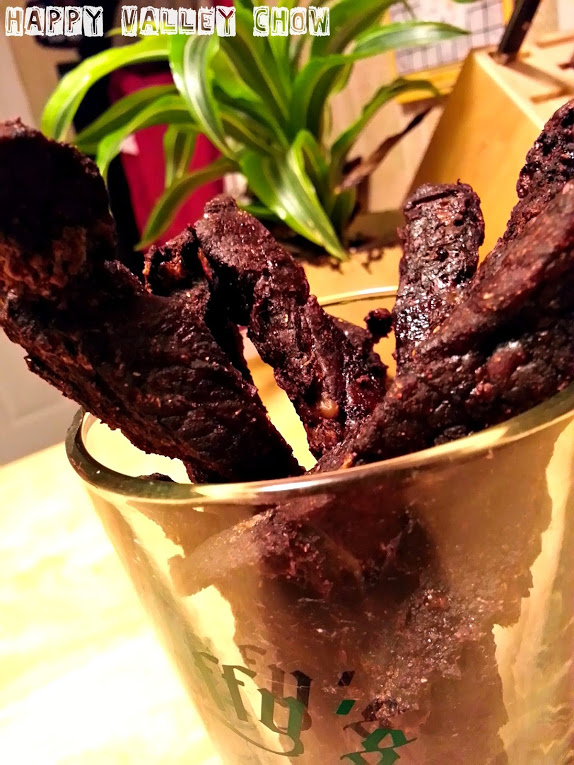
Alright I'll be the first to admit that this looks like a glass full of dry...well you know. But, you know what, taking a beautiful picture of beef jerky is a hard job! Growing up in the heart of Pennsylvania, jerky was like turkey on Thanksgiving. It would only usually come around once a year, right after deer season. Of course, the jerky I'm talking about was made of venison. Yes, to put it simply, I was a redneck. Not one of those really crazy rednecks that you see walking around your local Walmart from time-to-time, a normal redneck...if that makes sense. We often went hunting, camping, fishing, muddin' , etc. So, naturally, I love these delicious salty treats. Now that the Super Bowl is set, we are down to two weeks to party plan. I ask you this....is there anything more manly...more 'Merrrican...than sitting down, watching a game of football, with a cold Yuengling and a hunk of dried meat? I think not....don't deprive your guests of this opportunity to express their Patriotism.
History of Jerky
"Ch'arki", a name derived from the Quechuan language of the Incas (which literally translates into "dried meat"), later evolved into what we now call jerky. The discovery of Jerky allowed humans to both store food for long periods of time and have an easily carried, dense source of nutrition to take with them on journeys. Jerky is both flavorful and compact and almost any meat (except pork) can be made into jerky. Some say Native Americans made the first jerky (buffalo jerky) thousands of years ago, while others say an ancient Inca tribe called the Quechua made jerky as early as the 1500's. Whatever the case, this time tested recipe has been passed from generation to generation.
When the first Europeans arrived in the New World, they found that the Natives were making a dried meat product that did not need to be consumed immediately and they instantly knew that jerky would be beneficial to them. What the Native American tribes called "pemmican" was jerky meat added to either crushed dried fruit or animal fat. The Native Americans taught the settlers how to cut and prepare the meat into long strips and later shared with them the entire jerky-making process and some variations of seasonings to make different recipes. With this newfound knowledge and time-tested recipe, the European pioneers found themselves cooking and consuming jerky more than ever before; it was absolutely the snack of choice.
Jerky reached its height of popularity during the expansion into North America, where traders and explorers prized it as an essential source of nutrition as they traveled to new areas with limited accessibility to fresh food and supplies along the way. The fact that meat could be hunted anywhere along the trails that the settlers were following to the West made this method of preparing meat an extremely valuable skill. This was also the introduction of other jerky meat types such as turkey, goose, and other wild game.
You know what would make an awesome Super Bowl party?? A FREAKIN' JERKY BAR!! Beef Jerky, Venison Jerky, Turkey Jerky, Chicken Jerky, Buffalo Jerky....an endless table of jerky...I love it!
Ingredients
2 lbs eye of round, trimmed of all fat
1 1/2 tablespoons kosher salt
2 teaspoons sugar
2 teaspoons garlic powder
1 teaspoon onion powder
1 teaspoon cayenne pepper
1 teaspoon chipotle powder
1/2 teaspoon ground coriander
1/2 teaspoon smoked paprika
Directions
Slice the beef with the grain into 1 inch thick by 3 inch long strips. They may seem big, but that's fine. They will shrink significantly during the cooking process. In a mixing bowl combine all the try ingredients, mix to incorporate. Add all the beef strips to a large ziplock freezer bag, add in the spice mixture and toss to coat all the strips. Refrigerate the beef for 24 hours.
Preheat the oven to 250° F
Line a baking sheet with aluminum foil and place a baking rack on top. Place the strips on top of the baking rack, making sure the strips are not touching or overlapping, this allows for even drying. Bake for 6-7 hours, until fairly dry. If you prefer the jerky to be on the chewy side, remove after 6 hours. Otherwise, leave it in for the full 7 hours.
You know when else is a good time to eat beef jerky?? While watching Arnold Schwarzenegger movies!
The Super Bowl is right around the corner (Feb. 3rd). Even though my team, the six time super bowl champion Pittsburgh Steelers, aren't in the mix (and haven't been for some time), that doesn't mean I don't love to celebrate the tradition! This time of year usually means that parties will ensue celebrating America's past time with beer and lots of really unhealthy food. What better way to celebrate a home grown American sport, than with one of the most iconic american foods....Macaroni n' Cheese! But, instead of making it the usual Mac n' Cheese, lets give it a twist and make it a Cheesesteak Mac n' Cheese. Peppers, onions, thinly sliced sirloin mixed in a creamy cheddar and provolone sauce. Heck, why not throw a Mac n' Cheese Super Bowl party and also make Lee's Buffalo Chicken Mac n' Cheese. I based this recipe off the Buffalo Chicken Mac, so you'll notice some similarities in the preparation. Want the Mac n' Cheese to be portable and more like an appetizer?? Well then just follow the directions for the Deep Fried Mac n' Cheese Bites!
Ingredients
7 tablespoons unsalted butter
1 lbs sirloin steak, thinly sliced into bite size chunks
1/2 cup onion, medium dice
1/2 cup red pepper, medium dice
1/2 cup green pepper, medium dice
2 cloves garlic, minced
Kosher salt, to season pasta water
1 pound elbow macaroni
2 tablespoons all-purpose flour
2 teaspoons dry mustard
2 1/2 cups half-and-half
1 pound sharp cheddar cheese, shredded
8 ounces provolone, shredded
2/3 cup sour cream
1 cup panko bread crumbs
Smoked paprika
Directions
Preheat the oven to 350°F
In a large saute pan set over medium high heat, add in the sirloin steak and saute until brown and cooked through, about 8 minutes. With a slotted spoon, remove steak from saute pan and reserve on a plate. Clean out the saute pan and melt 3 tablespoons of butter. Add in the onion and peppers and saute until tender, about 5 min. Add in the garlic and saute until fragrant, about 1 minute. Season the mixture with salt and pepper then add the steak back into the pan and incorporate. Remove from heat and set aside.
Bring a large pot of salted water to a boil; add the pasta and cook until al dente, about 7 minutes. Drain the pasta and run under cold water to stop the cooking process, reserve noodles. *Note: if the noodles are going to be sitting for awhile, toss them in some olive oil to prevent sticking*
Melt 2 tablespoons of butter in a saucepan over medium heat. Stir in the flour and dry mustard and whisk until smooth. Whisk in the half-and-half and whisk until thick, about 2 minutes. Whisk in the cheddar and provolone cheeses, a little at a time until it is melted. Then whisk in the sour cream until smooth. *Note: if you have a immersion blender, use that instead of whisking. This will help emulsify the cheeses better and make a smoother sauce*
Spray a 9-by-13-inch baking dish with cooking spray. Spread half of the macaroni in the baking dish. Then add the steak, onion and peppers mixture and then spread half of the cheese mixture. Top with the remaining noodles and cheese mixture.
Put the remaining 2 tablespoons of butter in a medium microwave-safe bowl and microwave until melted. Stir in the panko and mix until incorporated. Sprinkle the panko mixture on top of the mac n' cheese, sprinkle some paprika on top and bake for 30-40 minutes, until bubbly. Let rest for 10-20 minutes on a cooling wrack (Unless you like molten cheese sauce coating your mouth).
One of my favorite Super Bowl moments
Or was it this?? I almost puked and passed out during both...
If you haven't guessed by now, I love to make soup. It's the perfect time of year for a warm and hearty soup...with the winter weather and all. I was having trouble coming up with a name for this soup, cause at first I wanted to call it Jalapeno Popper chowder, cause it has jalapenos and cream cheese in it. But, after tasting, I realized it tasted nothing like a jalapeno popper. My fiance then made the point that it tasted like a chipotle burrito in the form of a soup. She was absolutely right...as usual...we then came up with this name. I swear to you, if Chipotle made a soup, this is what it would taste like. I would also describe it as almost a creamy chili...it's delicious, none the less. Enjoy!
Ingredients
4 thick slices of bacon, chopped
1 1/4 lbs chicken, cut into bite size pieces
2 teaspoons chile powder
1 teaspoon ground cumin
1 teaspoon oregano
1 small onion, diced
1 red pepper, diced
4 jalapeno's, seeded and diced
3 cloves of garlic, minced
1 (14 oz) can petite diced tomatoes with juices
1 1/2 cups chicken stock
2 cups canned cannellini beans, drained
1 cup corn, fresh or frozen
8 oz cream cheese, cubed into smaller pieces
Shredded Mexican cheese mix, for garnish
Chopped scallions, for garnish
Directions
Heat a dutch oven over medium eat, add in chopped bacon and cook until crisp, 5-8 minutes. After bacon has crisped up and the fat has rendered, add in the chicken pieces and saute until cooked through. Then add in the chili powder, cumin and oregano and mix until incorporated.
Add in the mirepoix (onion, red pepper and jalapeno), cook until soft and translucent, about 10 min. Then add in the minced garlic and cook until fragrant, should take no more than a minute. Add the diced tomato, chicken stock, cannellini beans, and corn. Bring to a boil, reduce heat to a simmer and add the cubed cream cheese. Cover and cook until cheese has melted and is fully incorporated into the soup. Garnish with cheese, scallions, and serve.
When trying to title this post, I was having some difficulty. I didn't want to call it what it actually is, because what it actually is a Granny Smith Apple, Gorgonzola Cheese, Bacon Lardons, Toasted Walnut Pizza topped with honey...That name just wasn't going to work. Since I cooked the pizza in a cast iron and in my previous post about cast iron care I featured the Rolling Stone song "Satisfaction." I thought BINGO! I'll call it The McJagger! Because this pizza brought me satisfaction on so many levels. Enjoy :)
Set oven rack to the highest position and turn broiler on.
Roll out pizza dough into a circle the same diameter as a 12" cast iron pan. Heat your cast iron pan over medium heat. Add the garlic and herb infused EVOO (or just use regular EVOO) to the pan, should shimmer if the pan is hot enough. Add the pizza dough to the pan and cook until gold brown on one side, about 5 min.
Flip the crust over, while the other side is browning add the toppings. First the apple, then gorgonzola, walnuts and bacon lardons. Transfer pizza to oven and broil until the cheese has melted. If you feel like pizza dough needs to cook a little longer, remove pizza from cast iron, place it directly on the oven rack and turn the oven down to 350℉. Bake until cooked to desired doneness. Remove from oven, slice and drizzle with honey.
*Garlic and Herb Infused EVOO can be substituted for regular EVOO
**Bacon Lardons can be substituted with regular crumbled bacon
Note: This recipe is just enough for a small 12" pizza (enough for 2 people). You can of course make this into a larger pizza on a regular pizza pan.
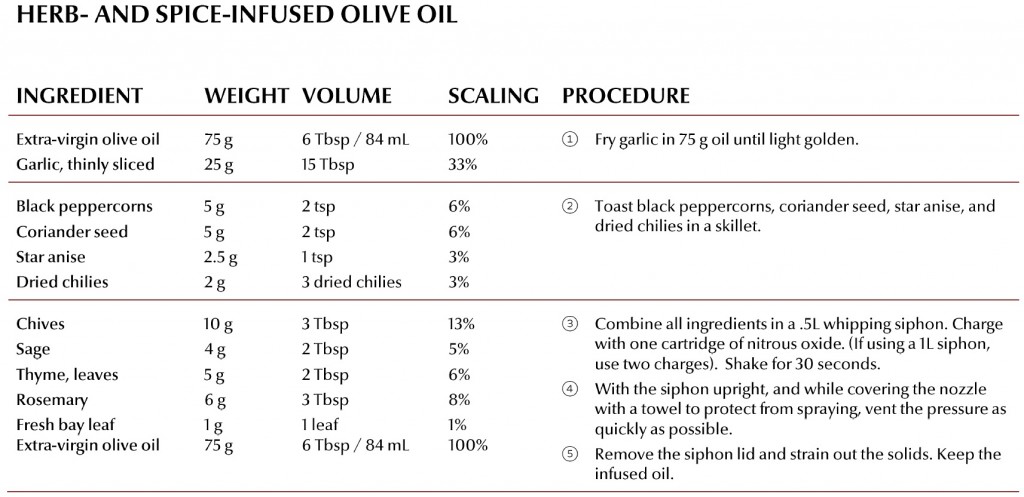
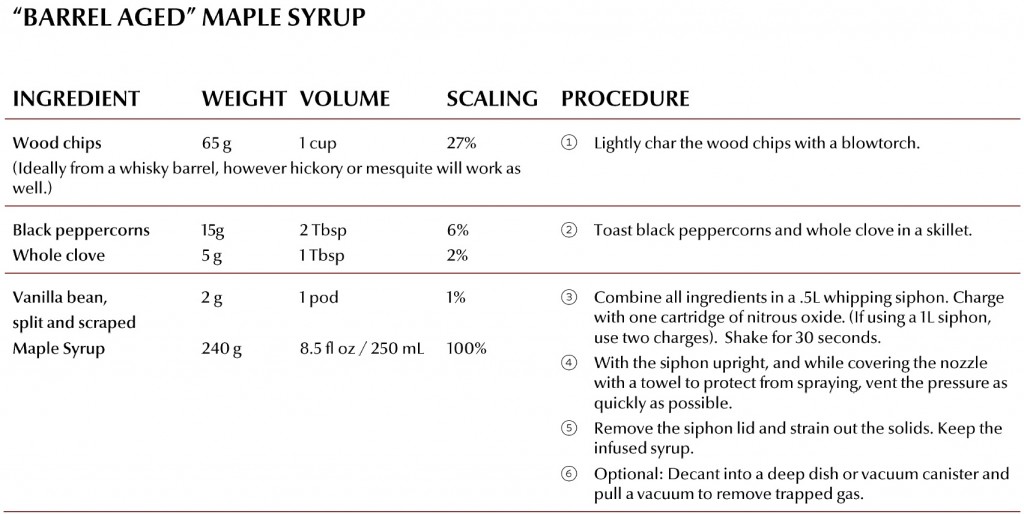
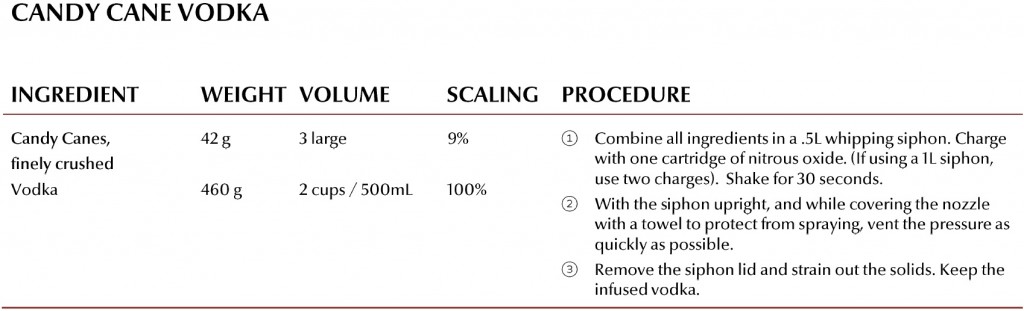
I have had my iSi whipper for awhile now and what I am starting to realize just how versatile this little gadget is. While it does make a mean whip cream, that just scratches the surface of what this thing can do. For this post I'm using it to make an instant EVOO infusion. Normally something that can take weeks, literally can be done in under a minute in an iSi whipper. To obtain this instant infusion we use nitrogen cavitation. Which by definition is "Cell disruption by nitrogen decompression from a pressurized vessel is a rapid and effective way to homogenize cells and tissues, to release intact organelles, and to prepare cell membranes." Translated we are basically subjecting the ingredients to high nitrogen pressure, which when suddenly released causes the cells to burst as nitrogen bubbles form inside them. The possibilities are endless with this! Not only can you infuse oil with any porous ingredient(s), but you can infuse anything! Alcohol, water....whatever your little heart desires! Again this is just one of the many MANY things an iSi Whipper can do. This device definitely ranks high on my list of "must haves" in the kitchen.
Santa was kind enough to bring me my own copy of Modernist Cuisine at Home which is where I first discovered the use of nitrogen cavitation to create infusions. I slightly adapted their Herb- and Spice-Infused olive oil (I didn't have everything). I only used the fried garlic slices, black peppercorns and the rosemary leaves. A big thanks again to the Modernist Cuisine at Home people for letting me share these recipes from their book. If you want to become a better cook, MCAH is definitely a book you need to get!
Check out what I used my Insta-Infused EVOO for....I call it The McJagger!
I was thinking the other day that I don't post enough how-to posts, actually none. Over the holiday break I decided that I needed to re-season my cast iron pan. I only have one and I love it. Cast irons, in my opinion, are the best cooking pans out there. The only down fall with them is that they are heavy, they take a little longer to heat up and you have to take care of them.
The thing that separates a cast iron pan from the rest of the pack is its ability to retain heat. Once you get it heated up (Usually takes about 5 minutes) it will hardly cool down when adding food to the pan. A standard aluminum saute pan, when adding a half-pound rib eye steak, can drop by 300°F. Where as a cast iron pan will stay around it's original temperature, which makes for a thicker, crisper and more evenly browned crust. This is also true when frying in oil, which I use my cast iron for all the time. Not only does frying help keep the pan nice and seasoned. But, when you add your chicken to the fry oil in a cast iron, the heat retention from the it is going to keep the oil to temperature. You can also braise and bake in them (Check out my Jalapeno Cheddar Cornbread). Breads, pies and pizza comes out beautiful when baked in a cast iron.
Another advantage to having cast irons is that it is probably the only thing in the kitchen that gets better with age. They are extremely durable, even a rusted 80 year old cast iron that you bought from a garage sale can be brought back to life. The very best of pans have been passed down over multiple generations, their well-used surfaces worn as smooth and nonstick as teflon-coated pan, without the toxic chemicals.
But, in order to get the most out of your cast iron, it HAS to be taken care of properly. It is very much like taking care of a puppy, they both require some work, a little patience and most of all...loyalty. If you take proper care of your cast iron it will pay back your investment with golden-brown fried chicken, sizzling bacon, corn bread, apple pies, perfectly seared steak and bubbly pizzas....ahhhh satisfaction indeed!
How do you season a cast iron pan?
Scrub your pan by pouring a half cup of kosher salt into it and rubbing it with a papper towel. This will scour out any dust and impurities that may have collected in it. Wash it thoroughly with hot, soapy water and dry it carefully.
Oil your pan by rubbing down every surface with a paper towel soaked in a highly unsaturated fat like corn, vegetable, or canola oil. Unsaturated fats are more reactive than saturated fats (like shortening, lard, or other animal-based fats), and thus polymerize better. It's an old myth that bacon fat or lard makes the best seasoning agent, probably from the fact that those fats were very cheap back in the day.
Heat your pan by placing it in a 450°F oven for 30 minutes (it will smoke), until it's surface is distinctly blacker than when you started. An oven will heat the pan more evenly than the stovetop will, leading to a better initial layer of seasoning.
Repeat the oiling and heating steps three to four times until your pan is nearly pitch black. Pull it out of the oven, place it on the stovetop to cool. Your pan is now seasoned and ready to go.
Until you've got a good layer of seasoning built up, avoid excessive use of soap or cooking acidic sauces. Both can make the seasoning process take longer.
How do you properly maintain your cast iron?
There seems to be a irrational fear of cast irons because people don't want to take care of them. But, truthfully, once you build up a good layer of seasoning, they are quite tough. You can't scratch it out with metal utensils. You can't destroy it by using soap (To days dish detergents are very gentle on everything except grease). To maintain and build on it, all it takes is to follow these few points:
Use it often.A good layer of polymers should build up slowly in thin, thin layers. This means using your pan as much as possible—particularly for oil-based tasks such as frying or searing. Avoid cooking liquid-based dishes in the pan until it has acquired a reasonably good nonstick surface
Clean it immediately after use.Removing food debris is much easier from a hot pan than from one that has been allowed to cool. If you clean your cast iron skillet while it is still hot, chances are all you'll need is a tiny bit of soap, and a soft sponge. I'm particularly wary of this at dinner parties when a well-intentioned guest may decide to chip in after dinner and get a little too generous with the elbow grease, potentially scrubbing out some of my seasoning
In most cases, avoid tough abrasives.These include metal scrubby scouring pads, and cleaners like Comet or Bar Keepers Friend. The scrubby side of a soft sponge should be plenty for most tasks
Dry thoroughly, reheat it, and oil it before storing.After rinsing out my pan, I replace it on a burner and heat it until it just starts to smoke before rubbing the entire inside surface with a paper towel lightly dipped in oil. Take it off the heat, and let it cool to room temperature. The oil will form a protective barrier preventing it from coming into contact with moisture or air until its next use
They can't get no Satisfaction cause they don't own a cast iron :)