Instant Pot Carnitas

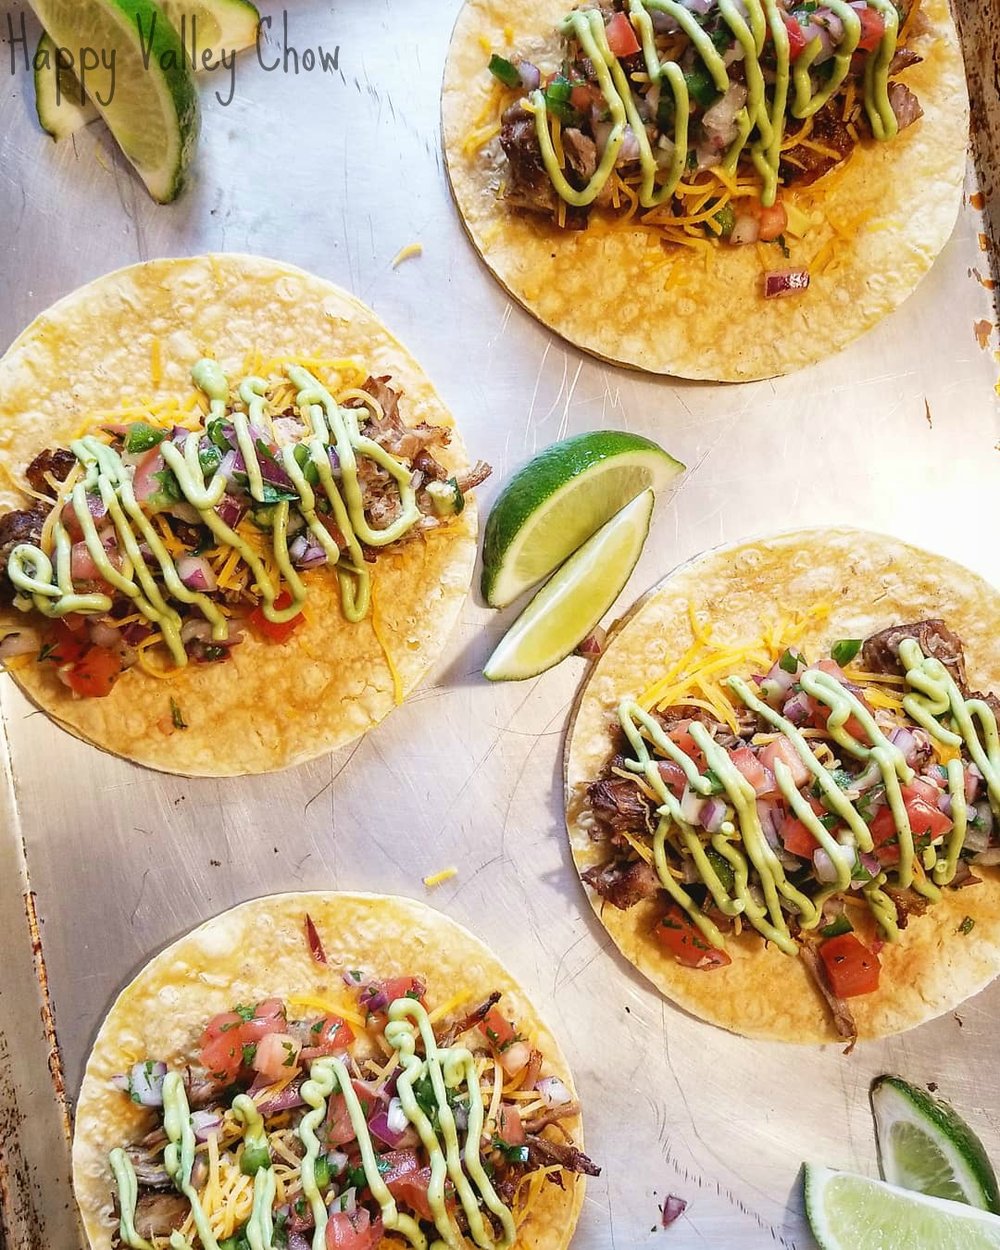
Hey everybody! So, I’ve been hearing about it…I’ve been reading about it…the Instant Pot. At first I brushed it off, I mean I have a pressure cooker, I have a slow cooker, do I really need this device? I’m also the type of person that tends to stay away from another kitchen “gadget.” But, Instant Pot has been so popular for so long with so many great things said about it that I couldn’t ignore it anymore. So, I decided to make a space in my kitchen for it and for my birthday my beautiful wife and in-laws ended up getting me on…so it’s been about a month since I got it and I just now finally busted it out! I was perusing the internet, looking at what other people were doing and settled on trying some carnitas. All I can say is WOW! It really is a great kitchen appliance. It was so nice to be able to saute, pressure cook and then keep the food warm all in one pot! I also really like how it takes a lot of the guessing work out of pressure cooking. I have a stove top pressure cooker as well and you kind of have to baby sit them while they do their thing. I was also really impressed how easy it was to clean. So, even though I only have one cook under my belt, so far I give this thing two big thumbs up. Can’t wait to do more with it! So, as far as the recipe goes, I made some very traditional pork carnitas, that I served on yellow corn tortillas, with homemade pico de gallo and a avocado crema. Give it a try and let me know what you think!
Instant Pot Carnitas w/ Pico de Gallo and Avocado Crema
Prep time: 30m | Cook time: 1hr | Total time: 1hr30min | Yield: 8 servings
Ingredients
-
- 4 lbs Boneless pork butt, cut into 2" chunks
- salt and pepper
- 1 Tbsp canola oil
- 1 cup beer
- 1 head garlic, peeled and minced
- 1/2 cup orange juice
- 1/4 cup lime juice
- 1 tsp dried oregano
- 1 tsp cumin
- 1 tsp salt
- 1/2 tsp black pepper
- 1/2 tsp ancho chili powder
- 16 - 6" yellow corn tortillas
- Cheddar cheese, shredded
- Pico de Gallo, recipe follows
- Avocado Crema, recipe follows
Cooking Directions
- Click the “Saute” setting on the Instant Pot and let heat. While Instant Pot is heating, season pork chunks with salt and pepper. Add oil and , working in batches, sear pork — turning every 45-60 seconds or so — until the pork is browned on all sides. Transfer pork to a separate clean plate, and repeat with the rest of the pork, searing until browned on all sides. Press “Cancel” to turn off the heat.
- While the pork is browning, in a separate bowl whisk together the next 9 ingredients.
- Return the browned pork and the sauce to the Instant Pot. Lock the lid in place and set the Instant Pot to pressure cooking on High for 30 min. Cook. Then let the pressure release naturally, about 15 minutes. Carefully turn the vent to “Venting”, just to release any extra pressure that might still be in there. Then remove the lid.
- Turn your oven broiler on high. Placing a towards the top in the oven.
- Remove work with a slotted spoon and place on a rimmed backing sheet. Shred the pork with two forks then ladle some of the sauce over the pork. Put in the oven and broiler for 4-5 minutes until the works starts to brown and get crispy. Remove from oven, top with more of the sauce and toss with some tongs. Return to oven for another 4-5 min until brown and crisp. Remove from oven
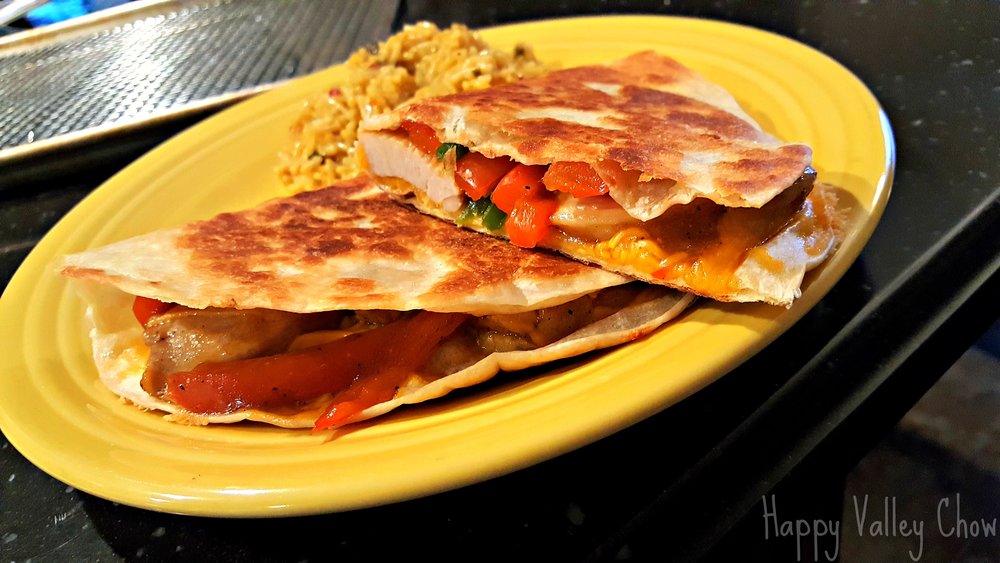
- Heat and crisp the corn tortillas on a cast iron pan or baking steel. Use two corn tortillas per taco. Top with carnitas, cheese, pico de gallo, and avocado crema
Pico de Gallo
Prep time: 10m | Total time: 10min | Yield: 4-6 servings
Ingredients
-
- 3 red onion, medium dice
- 12 Roma tomatoes, medium dice
- 2 Cups cilantro, chopped
- 3 jalapenos, fine dice
- 1 lime, juiced
- 1 tsp cumin
- salt, to taste
Cooking Directions
- Put all the ingredients in a medium bowl and stir to combine.
Avocado Crema
Prep time: 10m | Total time: 10min | Yield: 1 batch
Ingredients
-
- 2 avocados
- 1 garlic clove
- 1/4 cup sour cream
- 1/4 cup water
- 1/2 tsp salt
- 1 lime, juice
- 1/4 tsp ancho chili powder
Cooking Directions
- Put all the ingredients in the bowl of a food processor and puree until smooth. Add more lime juice to adjust consistency; should be thick but still smooth enough to squeeze out of a bottle. Transfer to a squeeze bottle and use as needed.
Other Recipes You May Enjoy…


Guacamole

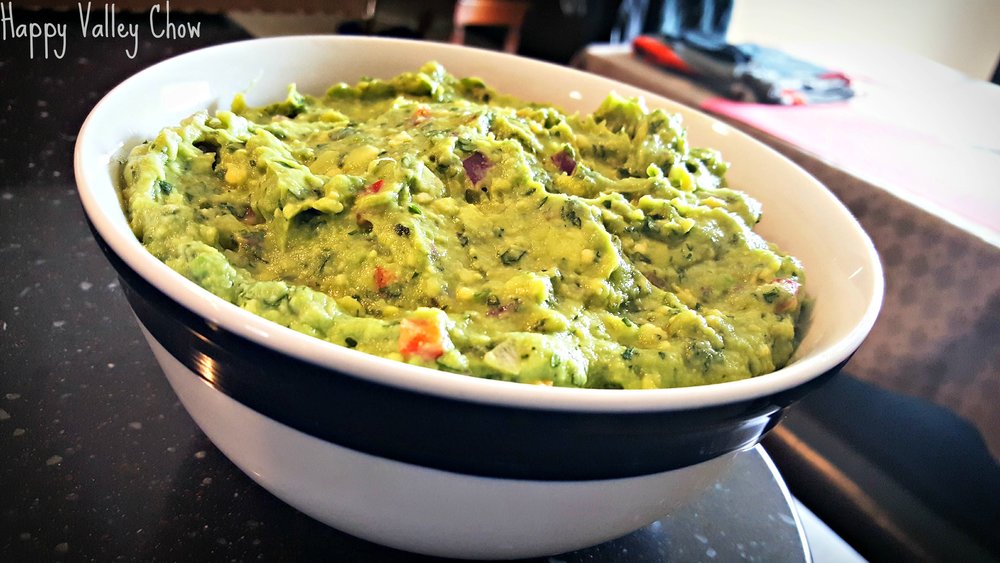
Guacamole is one of my favorite dips, right behind Galliker's french onion chip dip. It's super easy to make and just has such a great, fresh flavor...and people tend to love it so it usually goes over well. This recipe is very traditional and honestly, I don't believe guacamole should ever be over complicated....don't mess with it! This entry is a two-parter. I made a big batch of guacamole to make homemade burrito bowls one night. So my next recipe will be the burrito bowls. I figured this guacamole recipe deserved it's own post...it's that dang good!
When beginning to write this entry, my mind started thinking, where did guacamole come from? Thank god for Google, I got a pretty quick answer that I thought was intriguing.
“When you’re eating guacamole, you’re eating history that dates back to the 1500s. The Aztec empire created this spread with the same exact ingredients that local restuarants use today. The Aztecs called this saucy spread “ahuaca-mulli” which translates to avocado-mixture or avocado-sauce. Pretty creative, eh? Of course, the secret didn’t stay with the Aztecs for long.
The Spaniards encountered the Aztec people and their ahuaca-mulli while exploring the New World and knew it would be a hit back home. Unfortunately, avocados are not native to Europe so there was a problem when trying to recreate the dish for friends and family when they returned to Spain. Over the course of time, guacamole has stayed in North and South America, while back in Europe the Spanish tried to duplicate the tasty treat with substitutions for the avocado. Of course nothing could live up to the guacamole they had in their travels.
The word guacamole is derived from Nahuatl, a language from Central Mexico. Years ago “waka’mole” and “huaka’mole” were were a few different ways to pronounce gucamole. Our society and fast-paced culture has even gone so far as to shorten this word with the abbreviation “guac” written on menus and featured on signs at local restaurants.
Guacamole has always been a table pleaser, as we can see. The Aztecs believed it to be a natural aphrodisiac and with more natural monosaturated fat and protein than other fruits available, it was vital to their diet. Avocados have almost 20 vitamins and minerals and have been found to help manage heart problems and cholesterol for some people.”
Guacamole
Prep time: 15m | Cook time: 0min | Total time: 15min | Yield: 3 cups
Ingredients
-
- 2 rip Hass avocados
- 2 tsp lime juice
- 2 Tbsp cilantro, chopped
- 1/4 cup red onion, finely chopped
- 1/2 jalapeno, including seeds, finely chopped
- 1/4 tsp kosher salt
Cooking Directions
- Cut the avocado in half and then remove the pit. Scoop the avocado flesh out and place in a medium bowl. Toss and coat with lime juice.
- Add the salt and using a fork or potato masher, mash until a smooth consistency is achieved
- Fold in the remaining ingredients and mix well. Taste the guacamole and adjust seasoning if necessary.
Sharing is caring...
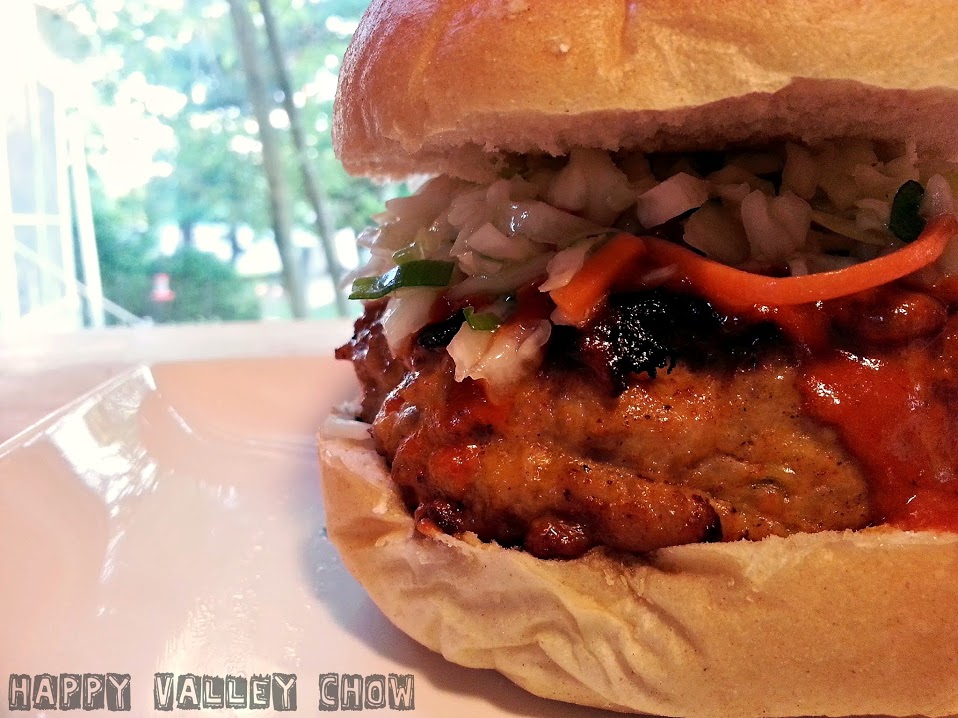
Smash Burger

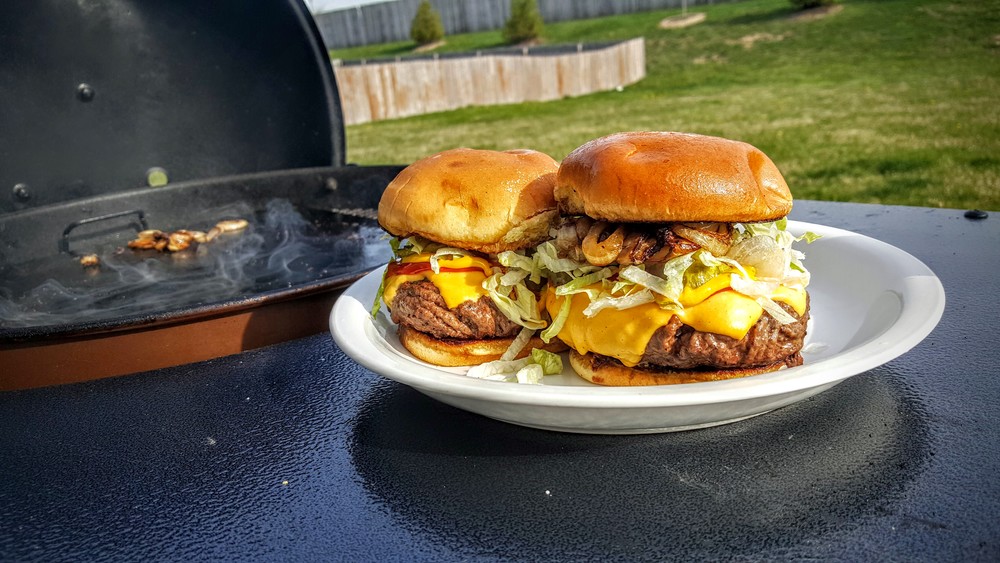
I tell you what, I think I have settled on my most favorite way to cook a cheeseburger. I've tried it all, grilled, sous vide, fried, forming patties by press, forming patties by hand...But, the one that I feel trumps it all, is the smash burger. Why?
- I get a fantastic crust (maillard reaction) on the outside of the burger. Grilling, while not a bad cooking method, tends to flare up and sometimes you get overcooked/burnt spots if you aren't extremely careful. "But, Eric, I want to cook my burgers on my grill!" Look at my picture! I used my Baking Steel as a griddle on my grill (Baking Steel even has a griddle version), added a few chunks of cherry wood to give it a smokey flavor, and I got a fantastic grill flavor. What a lot of people don't realize about grilling is the reason why you get the char flavor from grilling is because fat drips onto the hot coals or flavorizer bars, burns and smokes. That's where that grilled flavor comes from. So how do we get that flavor if the food isn't on the grill grates? Just spray some fat onto the coals or flavorizer bars and BOOM you get smokey goodness. In this case I used some wood, worked great and I got a smoke flavor.
- My burgers don't turn into giant, awkward, meatballs. I know, you're supposed to add a dimple to your burger patty to counteract the meatball effect. My problem adding the dimple is, what does that do your doneness? You have even thickness everywhere else, except for the center, wouldn't you imagine that the center would overcook? Smash burgers I start out as basically meatballs, get a crust on both sides and smash it down. Ever since I started doing this, I have never had a burger meatball back up. They stay in patty form!
- You don't over work the meat. People tend to add a bunch of stuff to their ground beef, mix it up, portion out the patties, form the patties. By the end, the strains of ground beef are compressed, and can lead to a dense burger. The smash burger, yes you roll into a ball, but the inside stays nice and lose, leaving to a very juicy and flavorful burger. Then, on top of that, since we get a beautiful crust on the burger from the griddle, we get a burger that doesn't fall apart. You bite into the crust and get a very juicy and flavorful burger, rather than one that may be dense, dry, and falling apart.
Step 1:

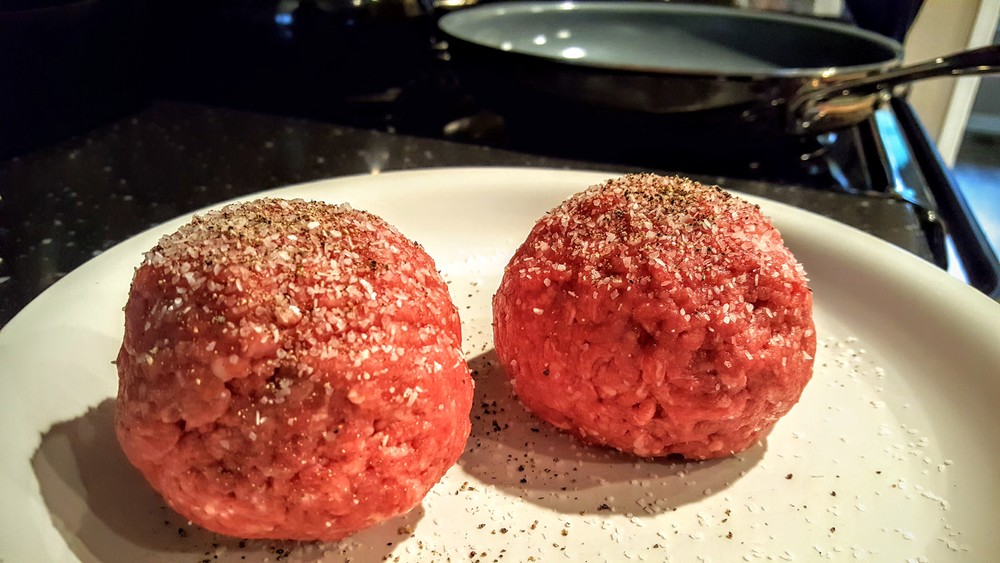
Gently form portioned ground beef into balls. Don't over work them, just press them enough to form them. These are 1/2 Lbs burgers, you can use this technique with whatever size burger you want, I made sliders this way as well! Season with salt and pepper on the tops.
Step 2:

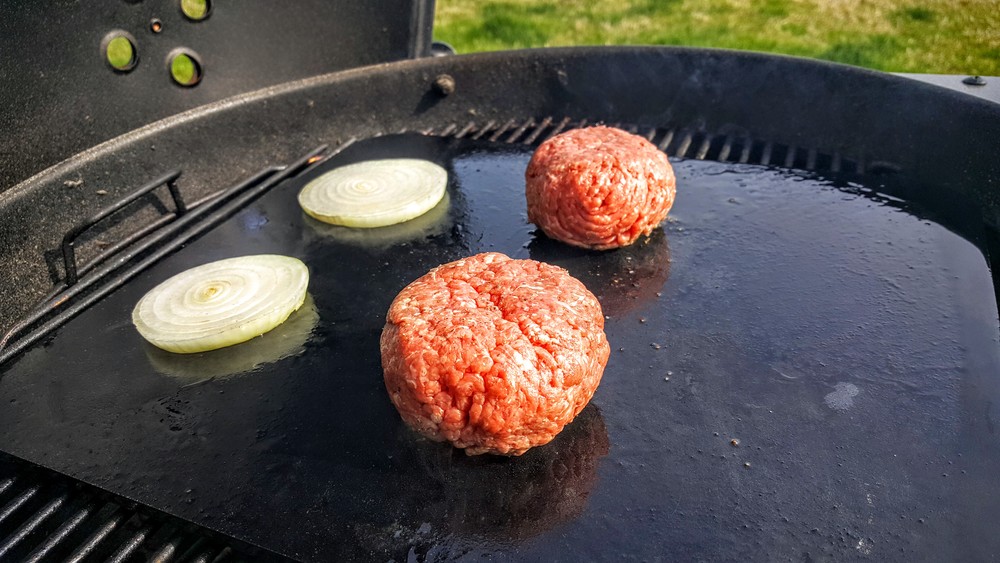
After preheating your Baking Steel, Griddle, or Saute pan over medium high heat. Put the season side down on to the grill. Then season the other side with salt and pepper. Let it sear for a minute or two. (I also put a couple slices of onion onto the griddle, caramelized onions are the Bee's Knees!
Step 3:

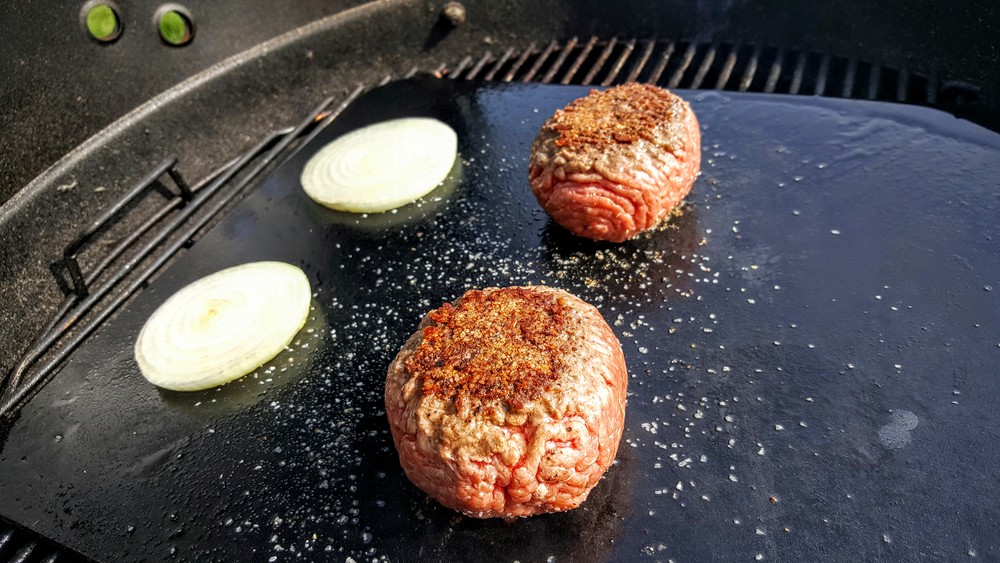
Using a pair of tongs, flip meatballs over and sear the other side for a few minutes until crust is formed.
Step 4:

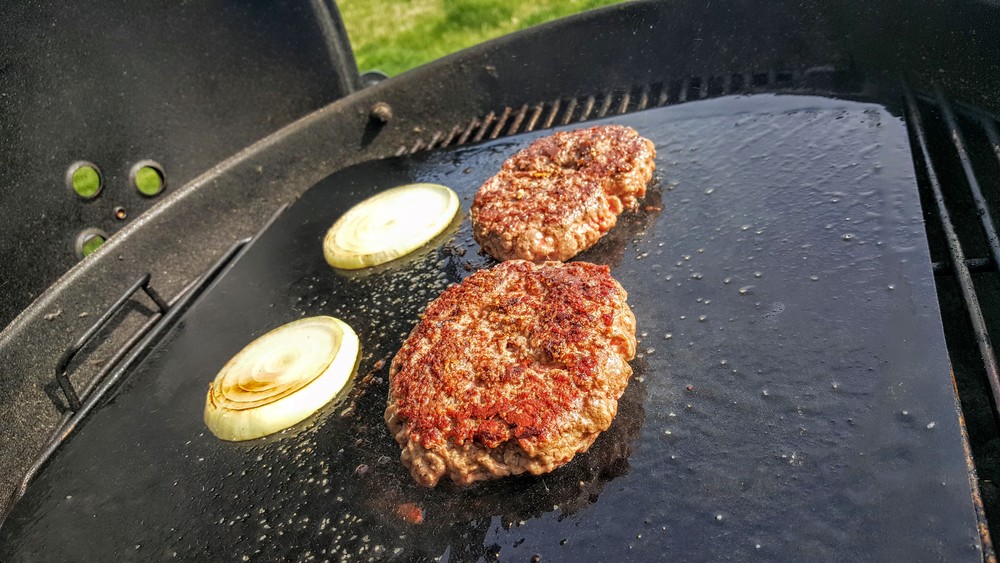
With a metal spatula, smash burger down into a patty. Once one side is fully seared, flip and completely sear the other side. Cook to your desired doneness and make sure to check the temp with a Thermapen Mk4. Top with cheese (if you wish) and serve!

One of my favorite kitchen tools and an essential tool in the kitchen is a Thermapen. If you are looking for a highly accurate, fast, and sturdy thermometer for the kitchen. This is the one you want!


Other recipes you may enjoy...